mmm4444bot
Super Moderator
- Joined
- Oct 6, 2005
- Messages
- 10,962
As time becomes available, I will post information in this thread about various ways that I use older versions of Micro$oft Paint and its features to create diagrams. (I'm not familiar with the versions of Paint bundled with Vista or Win7, so you might experience some differences in those versions. I used WinXP, for this thread.)
People sometimes try copy-and-paste with files or images from the Internet, only to find that it does not work. Security provisions are often to blame for this. Here is how I circumvent this roadblock.
All versions of Micro$oft Windows come with the ability to copy an image of practically anything that you see displayed on your monitor (video frames are one exception). Simply hold down the CTRL key while pressing the PRTSCR key (print screen). This keyboard combination sends a bitmap image of your screen to the clipboard, called a "screenshot".
You may then paste the contents of the clipboard into any Paint document (new or existing) and edit the resulting file at will.
Here's tip #1. In the earlier versions of Paint, we have the following issue. If the area of your blank document in Paint is smaller than the area of the image on the clipboard, Paint will nicely enlarge the dimensions of your blank document to match the dimensions of the image you want to paste. This is a nice feature because you don't need to know any dimensions.
It does not work the other way around. If the area of your blank document in Paint is larger than the area of the image on the clipboard, Paint will simply paste the clipboard image into the upper-left corner of your blank document. You will then need to crop the unused region, to resize your image manually.
I find that the default size of new documents in Paint is too large to make use of the autosizing feature. In other words, most of the time I am pasting smaller images from the clipboard. Therefore, I like to set the dimensions for new Paint documents to 16 by 16 pixels. This way, Paint will automatically enlarge the blank document to accomodate whatever I paste into it, saving me the time of manually resizing results from paste.
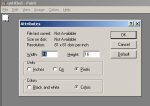
Here is how to reduce the default dimensions of your blank documents in Paint. On the menu bar, click Image and select Attributes…. You should now see a dialog box for changing the dimensions (shown below).
Note that the units are set to pixels and that my new, blank document size is just a small white area. (I don't expect anybody to be creating diagrams smaller than this.) All new documents in Paint will now be 16 by 16 pixels. You can always change the attributes back, if you desire.
[attachment=0:2e3j5ft8]scn2.JPG[/attachment:2e3j5ft8]
Here's tip #2. Use whatever zooming capabilities you have to get the desired element on your monitor to be the size that you want BEFORE you hit CTRL+PRTSCR. This is so much easier than trying to enlarge or reduce the pasted image from inside Paint.
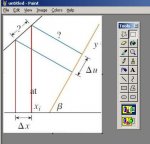
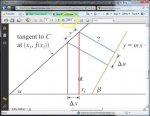
I will use as an example one of the images that I created for this thread, shown here. (Click image to expand, if needed.)
[attachment=2:2e3j5ft8]triangles.JPG[/attachment:2e3j5ft8]
STEP 1: Capture the screenshot
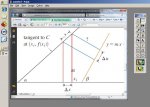
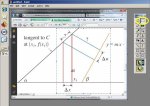
In this example, the original figure is located inside a PDF file posted by another user, and I wanted to alter this figure. So, I used the zooming controls within Adobe Acrobat's PDF Reader to get the desired figure elements on that referenced page to display on my monitor at the size that I wanted to post. The zoom controls are circled in yellow below (click image to expand, if needed).
[attachment=1:2e3j5ft8]scn1.jpg[/attachment:2e3j5ft8]
MY EDITS: Shown in purple
Attachments
Last edited:
")